More contrast

When you print circuit layouts on a laser printer, you don't get enough contrast. The Internet has overflowed with posts where people "solve" the problem by illuminating through 2 copies.
That solution only works for prints without small details.
A better solution is to heat the vellum at 180 degrees for 5 minutes. It gives 3-5 times as good contrast because the toner grains partially melts together.
A disadvantage of this method is that the vellum shrinks a bit, so you have to compensate for this by printing at 101-104% size. Check measurements of the print after baking.
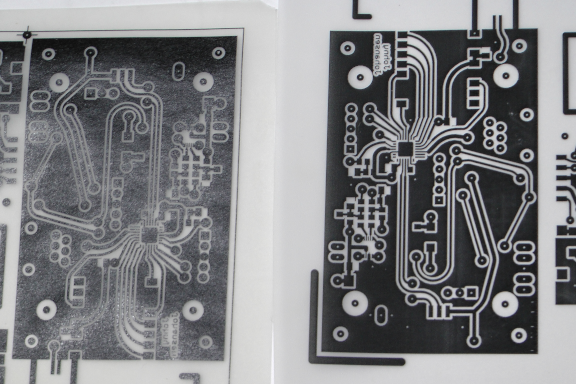
Comparison of baked vellum, on the left, with an as yet unbaked version on the right. Both pages lie with the toner side down on a white table.
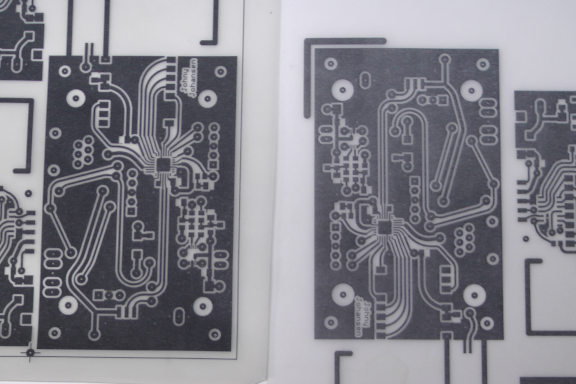
Below you can see how the toner layer is partially fused into a smooth surface, on the left, which reflects the light from a fluorescent tube, whereas the surface of the unbaked vellum is completely matte. Both pages lie with the toner side up.
You can experiment with temperature and length in the oven you use. Too high a temperature and length results in brown vellum, so that the contrast deteriorates strongly.
Even more contrast
You can increase the contrast another notch by using LaserStar Artwork Media from the company Fortex. I bought it here: https://dk.rs-online.com item number 2866773 (this is not sponsored in any way).When baking this product after printing it will be very soft, so place it on a flat surface immediately after removing it from the oven to prevent it from curling.
The laser toner pigment flows together really well, but be aware of how much it shrinks and compensate for it.
What I do is that I first print on a regular paper A4 sheet.
Then I cut out a piece of LaserStar, slightly larger than the object, and tape it to the paper, and print once more.
In this way, you use a smaller piece of LaserStar and on a flat surface, reducing the tendency to curl.
Use tape that can withstand the heat and that doesn't end up in the printer or deposit glue residue! I use masking tape.
IMPORTANT: Move the LaserStar piece to an empty spot on the paper so that the toner on the paper does not bleed onto the back of the LaserPrint (can be removed with acetone though).
The datasheet doesn't mention anything about baking after printing, but what a difference it makes.
See here a video of a slightly crumpled print, but what a contrast!